Flowers

Almost Time to Start Those Flower Seeds

My catalog seed orders have arrived. I’m always eager to get a head start on the garden season, and must force myself to not start them too early. Each flower seed packet will provide a guideline of when to start seeds. This is usually something like “6-8 weeks prior to the last spring frost,” meaning you count backwards from the frost date to the correct time to sow your seeds. This is a simple concept, but I find that using a printed calendar gives me a visual confirmation that I struggle to obtain when using the calendar function on my mobile phone. The frost date varies from area to area and the germination period will vary from plant to plant. If you don’t know your last average last frost, call your local Extension office and ask. In my area of the country, last frost date is April 15 but I always factor in where Easter falls on the calendar. If Easter is “late,” I delay my seed starting by an extra week. This year it falls on April 20, while some years it may fall in March. It is preferable to delay by a week than to risk transplanting your cherished seedlings outdoors to have them stunted by a late cold snap.

The tools for successful seed starting include: clean containers, good seed-starting medium, quality seeds, and warmth. (The need for light normally comes after germination.) Most big box stores and garden supply stores sell seed-starting kits, a waterproof tray that holds six or eight inserts, segregated into four or six sections. A complete kit may include soil and a plastic snap-on lid or dome cover to create a humid environment. It is easy to recycle plastic trays from year to year (I reuse those from plants I purchased in the past) but it is imperative that the recycled trays, dividers, and covers are clean. Before reusing old containers, I soak them for 30 minutes in a five-gallon bucket of bleach water (nine parts water to one part bleach), then rinse well and dry in the sun.

You can purchase starter items individually from better quality nurseries and farm supply stores: “flats,” soil containers that fit inside the flats (typically 4-packs, 6-packs, but can also be 128 plugs or other sizes), and plastic snap-on lids to retain heat and moisture.

Look for bags of “seed starter mix.” This is a very fine, lightweight soil-like substance that allows seeds to emerge with minimum effort. Fill packs with pre-moistened starter mix. If you cannot find seed starter mix, try vermiculite as a substitute. If the planting medium seems to shed water rather than absorbing it, either use hot water or add a drop of dishwashing detergent to the water used for dampening the mix. I prefer the hot water method, and usually dump a couple of cups of hot water directly into the bag and wait about 30 minutes for it to absorb, shaking the bag a few times for even distribution. Pack the damp mix into the containers, plant seeds at the depth recommended on the package, mist lightly (I use a spray bottle) to ensure seeds get wet, and top with a dusting of dry starter mix. Add water to the flat/tray holding the 4-packs or 6-packs. It will wick up to the seeds without displacing them. This is called “bottom watering.” Top watering (sprinkling the top) can displace seeds or wash them too deep into the starter mix. Give seedlings enough water to keep them from drying out but don’t allow the medium to be so wet that it appears shiny. Too much water can cause seeds to rot, invites gnats, and offers an hospitable environment for fungus growth.

Start with high quality seeds. You can purchase new packages each year, or use leftovers from the prior year, as long as the seeds were stored in a cool, dark, dry place. Some seeds will last several years (tomatoes) while others get stale quickly and should be purchased fresh each year (lettuce, parsley). And a few plants are more successful when started directly in the ground (“in situ”) than from transplants. The seed packet will state “best started outdoors” for these.

A few seeds need light to germinate, while others need total darkness. These seeds must be exposed to light in order to germinate: African Violet, Ageratum, Artemesia, Begonia, Bells of Ireland, Browallia, Chinese Lanterns, Coleus, Coreopsis (Tickseed), Dusty Miller, Aquilegia (Columbine), Gaillardia, Geranium, Heuchera (Coral Bell), Impatiens, Lychnis (Lamb’s Ears), Nicotiana, Penstemon, Pentas, Petunia, Platycodon (Balloon flower),  Poppies, Portulaca, Primrose, Snapdragon.

The following seeds need darkness to germinate: ) Armeria, Calendula, Catharanthus (Periwinkle), Centaurea, Delphinium, Echinacea (Coneflower), Gazania, Nasturtium, Tithonia (Mexican Sunflower).  

African violet, petunia, and wax begonia have such tiny seeds that I prefer to purchase plants rather than start them myself.

Reusing starter trays and packs without sterilizing them may introduce pathogens that will kill off your precious seedlings. It is heartbreaking to see a flat of new seedlings succumb, overnight it seems, to “damping off.” This condition makes stems look like they have been pinched. Once the stem develops this thin, pinched-looking spot, there is no recovery. Remove the seedling and its soil as quickly as possible, to prevent fungal spores from spreading to healthy plants. Prevent damping off by using clean containers, avoiding overwatering, and providing good air circulation.

Certain seeds (zinnia is one) resent root disturbance so much that they are happiest when sown in peat pots rather than in plastic packs. Once the seedling has emerged, the entire pot is planted outdoors and it breaks down in the soil. I have read concerning reports about the dwindling supplies of natural peat, and last year I spotted a new type of “peat” pot that is manufactured from sawdust (of which there is NO shortage). I trialed them in my own seed starts and found them to be equal to peat in every way, so will continue to seek these out.

Peat-free starter pots for seedlings which resent root disturbance

Warm temperatures make seeds germinate faster. Soil heating mats are available online and in nurseries that sell seed starting supplies. These are designed to raise the soil temperature about ten degrees warmer than the surrounding air and are sealed to be waterproof. The mats are the same size as a typical seed flat. The downside of using these germination aids is that they require electricity.

An example of electric seed tray heat mat offered by Amazon. There are many brands available.

Plastic dome covers retain heat and humidity. Once seeds have sprouted, remove any soil warming devices and plastic covers. Cooler temperatures and plenty of light will encourage stocky, strong seedlings. Good air circulation helps keep seedlings healthy. I utilize an old box fan to keep the air moving but do not direct the breeze directly at the seed flats.

Filled seed flat covered with plastic dome

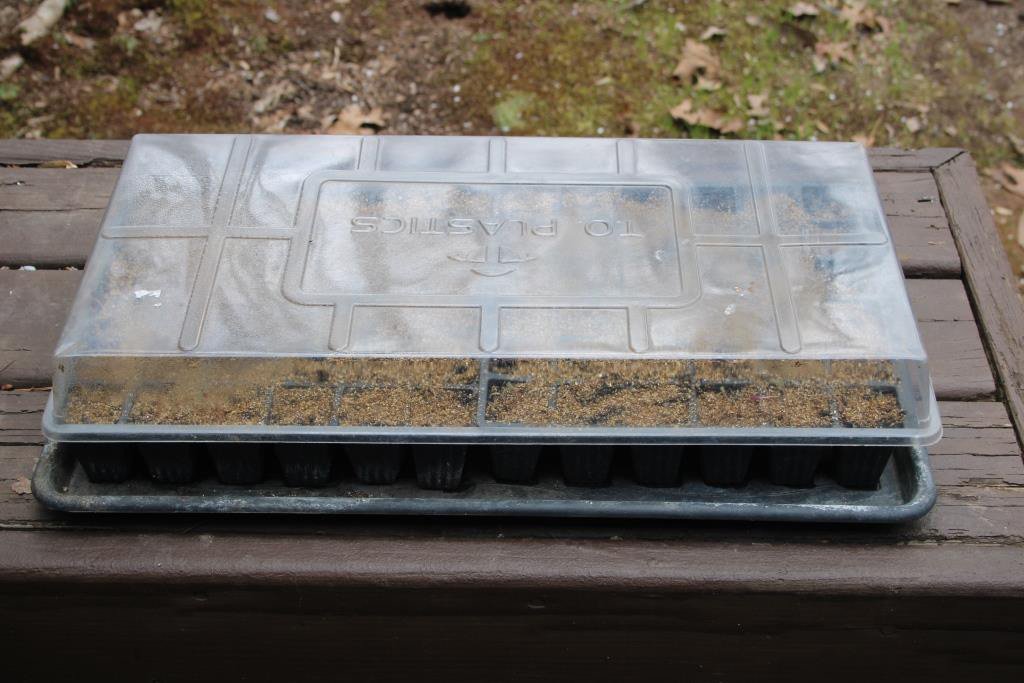
A plastic hat for the seed flat allows light to pass through but slows evaporation, keeping the soil damp.

Once seeds have germinated, they need plenty of light to grow and thrive. This can be particularly challenging if you are attempting to start seeds indoors near a sunny window. Insufficient light will result in spindly, weak plants. If weather is cloudy for a long stretch of days, new seedlings will elongate and weaken. If cloudy weather is in the extended forecast, you may need to add artificial light to keep seedlings strong and happy. When I first started gardening, grow lights were florescent. Now, LED lights are preferred because they emit high quality, intense light and use much less energy because they don’t produce heat.

Tall, skinny seedlings

These seedlings are growing tall and skinny - a clear sign that they need more light than they are currently receiving.

Dead seedling with brown stem

This poor seedling has suffered “damping off” from a fungal attack. The problem was likely caused by too wet a soil, as evident from the sheen of dampness on the starter mix.

Gradually acclimate seedlings to the harsh outdoors over a period of 7-10 days. This process is called “hardening off.”  Place seed flats outdoors in a protected area (away from winds and out of full sunlight) for an hour or two each day, gradually lengthening the time. If a day is especially blustery or unseasonably cool, skip it. Once temperatures are warm and threat of frosts and freezes are past, carefully transplant seedlings to their new homes. Handle them by leaves, not stems. A torn leaf does not impact future growth, but a damaged stem usually results in death. Below are my two favorite tools for lifting seedlings from starter packs, both moved from my kitchen: a square tipped sugar spoon, and an angled icing knife.

A sugar spoon is the light size to lift a seedling from a 4-pack seed tray and the angled icing knife is narrow enough to use when lifting from a smaller plug tray.

Starting your own seeds offers the benefit of many more choices than are available from transplants at local nurseries. And it’s fun!

Spring Seed Starting

Seed starting season is upon us, and I’m receiving “how to” questions. I do not profess to be an expert, but I can share what has worked for me. Here is the Mary Snoddy methodology, refined over several decades of hand-on experience.

Start with high quality seeds. You can purchase new packages each year, or you can use leftovers from last year, as long as the seeds were stored in a cool, dark, dry place. Some seeds will last several years (tomatoes) while others get stale quickly and should be purchased fresh each year (lettuce, parsley). Starting your own seeds offers the benefit of many more choices than are available from transplants at local nurseries. And some plants (corn, beans) are more successful when started directly in the ground (“in situ”) than from transplants.

Most big box stores and garden supply stores sell seed starting containers, a waterproof tray that holds six or eight inserts, segregated into four or six sections. A complete kit may include a plastic snap-on lid or dome cover to create a humid environment. It is easy to recycle plastic trays from year to year (I reuse those from plants I purchased) but it is imperative that the recycled trays, dividers, and covers are clean. Before reusing old containers, I soak them for 30 minutes in a five-gallon bucket of bleach water (nine parts water to one part bleach), then rinse well and dry in the sun.

Reusing starter items without sterilizing them may introduce pathogens that will kill off your precious seedlings. It is heartbreaking to see a flat of new seedlings succumb, overnight it seems, to “damping off.” This condition results in stems looking like they have been pinched. Once the stem develops this thin, pinched-looking spot, there is no recovery. Remove the seedling and its soil as quickly as possible, to prevent fungal spores from spreading to healthy plants. Prevent damping off by using clean containers, avoiding overwatering, and providing good air circulation.

Use seed-starting medium instead of potting soil or garden soil. Bags of “seed starter mix” are widely available. This is a very fine, lightweight substance that allows seeds to emerge with minimum effort. It is most efficient to fill the prepared starter trays with pre-moistened starter mix. If the medium seems to shed water rather than absorbing it, either use hot water or add a drop of dishwashing detergent to the water used for dampening the mix. I prefer the hot water method, and usually dump a couple of cups of hot water directly into the bag and wait about 30 minutes for it to absorb, shaking the bag a few times for even distribution. Pack the damp media into the containers, plant seeds at the depth recommended on the package, mist lightly to ensure seeds get wet, and top with a light sprinkle of dry starter mix.

A few seeds need light to germinate, while others need total darkness. These seeds must be exposed to light in order to germinate: African Violet, Ageratum, Artemesia, Begonia, Bells of Ireland, Browallia, Chinese Lanterns, Coleus, Coreopsis (Tickseed), Dusty Miller, Aquilegia (Columbine), Gaillardia, Geranium, Heuchera (Coral Bell), Impatiens, Lychnis (Lamb’s Ears), Nicotiana, Penstemon, Pentas, Petunia, Platycodon (Balloon flower),  Poppies, Portulaca, Primrose, Snapdragon.

The following seeds need darkness to germinate: (Don’t confuse germination with seedling growth. ALL seedlings need light to grow. Insufficient light will result in spindly, weak plants.) Armeria, Calendula, Catharanthus (Periwinkle), Centaurea, Delphinium, Echinacea (Coneflower), Gazania, Nasturtium, Tithonia (Mexican Sunflower).    

Warm temperatures make seeds germinate. Soil heating mats or cables are available in nurseries that sell seed starting supplies. These work great, but there is no need to get fancy like. I have had excellent success by repurposing a couple of old electric heating pads (the kind used for soothing sore muscles). Just take measures to keep them dry when in use.

Plastic dome covers retain heat and humidity. Once seeds have sprouted, remove any soil warming devices and plastic covers. Cooler temperatures and plenty of light will encourage stocky, strong seedlings. Good air circulation helps keep seedlings healthy. I utilize an old box fan to keep the air moving but do not direct the breeze directly at the seed flats.

Treat seedlings with tender care, giving them enough water to keep them from drying out without the soil being constantly wet.

Gradually introduce your seedlings to the harsh outdoors. This process is called “hardening off.”  Place seed flats outdoors in a protected area (away from winds and out of full sunlight) for an hour or two each day, gradually lengthening the time. This is the equivalent of developing a base tan so that your skin doesn’t blister from sudden sun exposure. If a day is especially blustery or unseasonably cool, skip it. There is no place for Tough Love in nurturing seedlings (unless you have sown them too thickly for good air circulation and healthy growth, which is not the topic of this blog).

Check the last frost date in your growth zone, then add a week for insurance before setting your darlings out in the wild world of flower beds, vegetable gardens, or containers. Sometime a stretch of warm temperatures leads us to assume that winter is over. Don’t be misled! It is always better to err on the side of safety than to suffer the loss of time and care invested when Nature has a cold, nasty hiccup.

Why tempt fate? Start only plants that will survive in your zone, soil type, and available light (sun exposure). Plant only vegetables that you and your family will actually eat. It does not matter if you can grow a fantastic bed of eggplant if no one in your family will touch it. Michigan State University has a great chart listing how many row feet to plant per person for various vegetables. Find it by clicking HERE.

Happy Seed Starting! I’d love to see photographs of your successes. Email pictures to mary@marysnoddy.com.

Filled seed flat covered with plastic dome

Ready, set, GROW!

Tiny seedlings leaning toward sun

These Gomphrena seedlings emerged two days ago, and they are already leaning toward the sun source.

Tall, skinny seedlings

These Zinnia seedlings are growing tall and skinny - a clear sign that they need more light than they are currently receiving.

Dead seedling with brown stem

A moment of silence, please, for this poor seedling that has suffered “damping off” from a fungal attack. The problem was likely caused by too wet a soil, as evident from the sheen of dampness on the starter mix.

Forsythia Foretells Spring

I spotted a single open flower on my Forsythia this week, a sure sign that spring is almost here. Bring it on!

Forsythia, commonly known as “Yellow Bells,” are old-fashioned, indestructible plants that spread to form large thickets. They are among the earliest of shrubs to bloom. Their arching stems are covered with unscented yellow bell-shaped flowers for several weeks before leaves emerge. Plants bloom on prior year’s wood, so prune thoughtfully. Do not shear into tight meatballs. Instead, use hand pruners to remove entire stems at ground level.

Forsythia (pronounced for-SITH-ee-ah) is hardy in zones 6-8. Its arching stems will reach ten feet in height, with an indefinite spread. It is not choosy about soil type or pH. It is easily transplanted, and rarely bothered by insects or diseases. Deer nibble on young plants but tend to leave larger, mature specimens alone.

In full bloom, this Forsythia hedge looks like a yellow ribbon winding its way through the garden.

Forsythias make a good informal hedge where area is sufficient. Avoid siting them in locations where their aggressive expansion might overtake weaker plants or invade the neighbor’s garden. Plant them in full sun for best flowering. Shrubs reach a height of  feet. Dwarf forms are available, but these also spread vigorously.

Cut a few branches with swollen buds to force blooms indoors.

Yellow bell-shaped flower on leafless stem
Shrub with yellow flowers

Happy Winter Faces of Pansies, Violas

Pansies are a popular flower choice for winter color. Pansy (Viola x wittrockiana) is a biennial used as a cool-season annual. In the Southeast, plant them in fall and enjoy their flowers until late spring, when heat causes their demise. Pansies are available with solid blooms, but many have multicolored blotches that look like happy faces. Colors are so consistent that they can be planted in swaths to create a pattern or tapestry effect.

Plant pansies in full sun to part sun, in well-drained soil, zones 6 through 10. They are not picky as to soil pH (acid, neutral, or alkaline) or type (clay, sand, or loam). They prefer a moist soil, so add a little irrigation if winter rains are lacking. Pansies will flower continuously in fall and cool spring, taking a little break in the worst of the winter. In the mild winters of recent years, they have flowered from September through May in the Mary Snoddy garden.

Remove spent flowers regularly to encourage more blooming. I find a pair of cheap dollar-store scissors ideal for this task, allowing me to easily remove the spent flower and its entire stem. It looks a bit creepy to remove the petals and allow the decapitated stems to remain.

Pansies are available in both upright and spreading forms. The upright types do not exceed 12” in height. The trailing forms make a beautiful hanging basket, which has the advantage of allowing the container to be moved to a protected area in the most frigid of temperatures, then returned to a sunny spot once those teens and sub-teen temperatures have abated.

The old-fashioned common name, “Hearts-ease,” refers to the yellow and purple, small-flowered ancestor from which today’s large, showy blooms arose. A closely related plant, Viola tricolor, is commonly called “Johnny Jump-Up” or “Wild Pansy” or simply “Viola.” These are smaller in stature and bloom size, but they make up for their small size by exuberant flowering. They are available in solids or bi-colors, although not as many variations as the large-faced pansy. They also reseed readily, and if left undisturbed will create colonies in deciduous woodlands.

Both pansies and violas are edible. They make pretty decorations for sweet goods, but are not flavor powerhouses. If you choose to “candy” the flowers for food decoration, it is best to use a pasteurized egg-white product (find this in the refrigerated section at your grocery) rather than straight-from-the-shell egg white to eliminate any chance of foodborne salmonella.

The yellow and purple flower of this Pansy makes me think of buttered toast with grape jam.

purple and white Viola flowers

Violas (“Johnny Jump Ups” have reseeded to cerate a mat of flowers.